Saturday, November 30, 2013

The Importance of Gutter Cleaning

Fall is the time homeowners and landscapers remember for the leaves that pile up in the yard and gutters. Gutters are especially difficult to clean. So why do we bother cleaning them? It is actually very important to keep you gutters clear, especially during the winter months. Here are a few reasons for why that is, and some tips to cleaning them out.


1. Leaky Basements and Cracked Foundations-
Clogged gutters are the number one cause for basement flooding and foundation cracks. If the water is not able to flow correctly out of the gutter, it will build up and eventually overflow around the foundation. This could mean a basement leak is just minutes away. It can also lead to cracked foundations if left alone for a long time.

2. Rotted Wood-
If the water is allowed to build up in the gutter, it can lead to rotting of the wood around the gutter. It can get VERY expensive to replace wood, so cleaning the gutter can save you money.

3. Sagging Driveways-
Clogged gutters can lead to sagging driveways and sidewalks. This will also be expensive to fix.

Overlooking the importance of gutter cleaning can lead to water damage which can get very expensive. Either clean the gutters yourself or hire a professional, but do not leave the gutter clogged. Keeping your drainage system running is very important.

Tyler Kaiser
T. J. Landscaping Inc.

Monday, November 25, 2013

French Drain

If you have puddles in your lawn and landscape after a storm, you might want to consider a french drain. This system is basically a hole underground that collects water and allows for easy drainage. Usually a pipe is installed to accomplish the draining.


To create a french drain, first dig a U-shaped trench six inches deep by three feet wide, pitching deeper where the water exits. Line the trench with heavy-duty plastic with one edge of the plastic up tight against the foundation. Install perforated pipe in the center of the trench, cover with spun bond fabric (weed barrier), cover this with clean 3/4 inch stone up to grade, and have the pipe exit some place to deposit water. Remember before doing any digging, contact Dig Safe or your local utility locator company to pinpoint gas and utility lines and save yourself potential headaches and harm.


Tyler Kaiser
T. J.  Landscaping Inc.

Monday, November 18, 2013

How to Deal with Storm Water

Rain storms can be disastrous to landscapes, especially in the North-East. Puddles in both the lawn and beds can kill plants and look bad for months at a time, if it is especially rainy. Here are a few ways you can protect your lawn by draining the water, and make it look natural and beautiful.

1. You can turn drainage solutions into features that enhance your landscape, and protect natural water ways. Ditches can be designed with small stones and rocks to allow good drainage, but look like a natural stream. If you only want to create a small swale, you are okay to do it yourself, but for a  small river, you should hire a professional landscaper because they usually have earth moving equipment. The best place to do this is usually a gutter runoff that runs into a water source. Planting ferns and other plants on the bank enhances the design.

2. Gutter drainage can be directed into rain gardens that can be butterfly and bird habitat. This type of garden is great for both drainage and design. Where are swale is a carrier of water, a rain garden is a destination. The idea of a rain garden is that water will drain quickly and sink into the ground promoting lush plant growth. Although a low spot in the lawn seems like a good place for a rain garden, these are usually soggy and saturated. Instead you should find a place in the lawn that dries quickly.

3. Driveways and patios are also susceptible to flooding. One way to avoid this is to bear flooding in mind before designing a patio or driveway. Creating a pattern that has holes in between the pavers is a great way to allow drainage. Laying the pavers on a layer of gravel is also good because it will drain quicker and eliminate most runoff. This could even be done with porous asphalt or concrete made with little or no sand, making small air pockets for water to drain through. These types of projects require a little extra planning, but draining can be very important.

With these simple tips in mind, rain storm water is manageable to deal with. Don't let the water ruin you landscaping. Be one step ahead of the storm and get prepared.

Tyler Kaiser
T. J. Landscaping

Saturday, October 26, 2013

The Importance of Winter Fertilizers

Late fall fertilizing is done to help lawns store more food in the winter and encourage the grass to grow thick and have healthy roots in the spring. It is not done to help grass grow over the course of the winter, early fall fertilizers are for encouraging growth.

When to spread Winter Fertilizers
The best time to spread these fertilizers is in late fall, after the grass stops growing. This could be as late as mid-November or even December, depending on location and weather patterns. A good rule of thumb is, when you put you mower away for the year, spread your winter fertilizers.

What to Apply
It was previously thought that potassium and phosphorus were what the grass needed at this time in the year. This has been disproved, and it is now understood that nitrogen should be a major part of winter fertilizers.

How to Apply
When applying be careful not to use too much. You are better off going with less than the recommended amount on the bag, because unabsorbed nitrogen can reach groundwater if you over apply. You should be able to get two or three times the amount the bag tells you. So if the bag says it will cover 5,000 square feet, you can probably get 10,000 to 15,000 square feet. With liquid fertilizers you can go even lighter.

Tyler Kaiser
T. J. Landscaping Inc

Monday, October 21, 2013

Keeping your Plants Healthy

Trees and shrubs are an important aspect of landscaping because they add texture, structure and color to you designs. Maintaining the health of these plants is rather simple, but some basic knowledge is required to care for them correctly. Here are a few tips that will help your plants reach their full potential.

Planting-
After putting a plant in the ground, the most important thing to do is water it well. Spread a 2-3 inch layer of mulch around the plant to keep it protected from the mower. This will also allow the soil to maintain its moisture longer, so you don't have to water as often.

Staking-
You may need to stake a newly planted tree to support it. This is usually done when planting bare-root trees, or if you are having a hard time keeping them upright. Support them only for the first year or two to ensure they develop sturdy roots and trunk. a very simple way to support a tree is to drive a stake into the ground about 8 inches from the trunk and tie a wire from the trunk to the stake. Make sure the wire is not too tight to avoid damaging the tree. You should put something between the wire and the trunk so the wire doesn't rub against the bark. An old hose section works well for this.

Pruning-
Trees and shrubs can benefit greatly from pruning. Here are a few guidelines you can follow to make this job easy. No matter what trees and shrubs you're growing, its a good idea to prune out any dead or diseased branches. This helps the plants look better and can prevent the disease from spreading. You should prune out any wayward stems that block pathways, driveways or grow into the side of a house or other structure. Also remove branches that cross and rub against one another; as the bark gets rubbed off, it makes the tree more susceptible to disease. Prune most summer-flowering shrubs (including rose of Sharon, butterfly bush, 'Annabelle' hydrangea and spirea) in late fall, winter or early spring.

These pointers will keep you plants looking good as well as healthy.

Tyler Kaiser
T. J. Landscaping Inc

Monday, October 14, 2013

Landscape Edgeing

One very important aspect about your landscape design is how well it fits with that area it is in, and how well it transitions. There are many materials and techniques landscapers use to make crisp lines for the edges of gardens and beds.

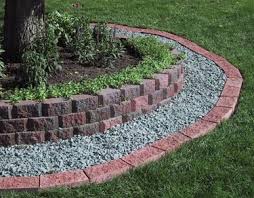
Brick- Brick is a common bed edging material. It is practical because it looks nice and is inexpensive.  If you decide to use this material, it is important to note that pushing the bricks as close together as possible will decrease the weeds that can come up through the cracks. Also, placing the bricks on top of packed sand will help to prevent heaving and unevenness.

Diagonal Bricks- Placing old bricks on their corners can give an interesting effect to certain beds. These bricks can be hard to come by, but they should be very cheap. Start by digging a trench a few inches deep, and bedding it with sand. This will help drainage, and prevent unevenness. Then place the bricks on a diagonal angle, with only part showing, and press them tightly together. Be careful that your lines are crisp with this design. If either side of the line gets too overgrown it can look neglected and sloppy.

Cast Concrete- Concrete can be a viable option for crisp edging because it is easily manipulated. You can wind paths, adjust the height and even create slopes to match surrounding landscapes. This is great for smooth transitions.

Flagstone- For a country or rustic landscape, flagstone usually fits very well. It is available in many colors so it can easily be coordinated to match your flowers and plants. The uneven and rough edges can be appealing for certain beds. These are practical because they are durable and stack well.

Cobble Stone- Square or rectangle blocks of granite can add a smooth line to your beds. This can look really good with certain plants. It has a rustic and uneven look, while maintaining order in your landscape.


No materials are necessary to make a bed look nice. There are many instances where the best look is a crisp edge, which can be created with an edger. This does require special attention when it comes to trimming the lawn, but is a less expensive solution that may prove to be fitting.

Tyler Kaiser
T. J. Landscaping


Tuesday, October 8, 2013

Fall Landscape Checklist

Fall is here, and with it comes a list of responsibility that should be done to your landscaping looking good for the winter. This list will give you a few suggestions on fall landscape checklist.


  • Aerate- Aeration will loosen up the hard ground and will provide extra nutrients to you lawn. This should be done with a core aerator to increase the drainage as well.
  • Fertilize- It is customary to cut back on fertilizers at the end of the season to prevent perennials from wasting energy on leaf production. but the grass roots will grow until the temperature gets around 40 degrees, so your grass needs food.
  •  Cut grass short- Your last cut should be around 1 1/4 inches because diseases have a hard time with short grass.
  • Rake leaves- Leaves can be used as a good source of compost, so rake your leaves onto a tarp, then put them inside a compost center. You can use anything you want to make the container. This will be very helpful for your garden next year.
  • Trim dead limbs- Dead limbs can succumb to snow and wind endangering your home and you. Cutting off anything you can will be helpful, and if need be, call in a professional.
  • Cut back perennials- Cut back any dead parts of your plants. This will increase the health for next year. Also, every three years it is a good idea to split perennials.
  • Clear your drip systems- Standing water freezes and can crack your irrigation pipes. Be sure to get the water out.
With these simple tasks, you can help your landscaping over the winter. 

Tyler Kaiser
T. J. Landscaping